"For the fishermen out there!"
Wanted some "STRONG" safe storage for my fishing rods while 4X4'ing through the Vic High Country & Mountains of NSW. After searching high & low for a decent solution which was never found (at least for me & my liking!), I needed to carry at least 4 rods & sometimes up to 8. So I decided to apply myself to come up with something, & something factory looking! I've had it installed for well over a year now & it been fantastic! No rods getting damaged, No rod tip flopping around, No lures or hooks getting stuck in anything (I travel fully rigged up ready to have a flick at a instant!) & above all EASY/QUICK access (& that’s on some pretty rough tracks for 2 week trip periods living out of the back of the truck). It's been a while so I'll try & remember all the steps!
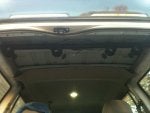
note; The gap between the handles above the front seats allows for another project I've got to complete this year which is the roof console from "LOST DOWN UNDER" (will get there mate, Soooooo many projects!!!!!)
"BIGGEST NOTE!!!!!" WHEN EVER DRILLING CLOSE,TOWARDS ROOF, SLEEVE YOUR DRILL BIT WITH THE APPROPIATE SIZED COPPER PIPE, LEAVING ONLY THE AMOUNT OF CUTTING EDGE SHOWING AT THE TIP OF THE DRILL! this most important trick will save you drilling through your roof at such close proximity. Good trick for most car/body fiddling!
(Forgive me if I miss some detail along the way. Measure it all up for yourself, as it was a fair while ago!)
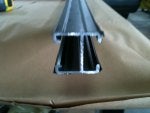
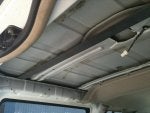
1. Bought a single piece of Rhino roof racking from Autobarn, from memory it was 1.8mtrs long. covered both sides with tape & ran it through a band saw to turn it from a "H" section, into a "C" section of railing

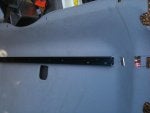
2. removed the rear roof lining. Got a piece of flat steel that was as wide as the roof racking, approx 4mm thick & long enough to sit on top of each lip of steel above each rear window by 10mm
3. Next drill & but DONT pop rivet the flat as shown on both sides (this is the driver’s side, you'll work out where I put it by the form marks/ripples in the steel) & mark the edge of the steel lip on the flat so you know your evenly inserted.
Cut your piece of "C" rack to exactly to the width on the underside of the lip, so the steel is above the lip & the ally rack is underneath so when they are screwed together, they make a solid sandwich on either side of the lip!
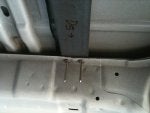
4. Pull the bit of flat out & lie your bit of "C" roof racking evenly spaced on top of it using your "LIP MARKS" you did before. Mark & drill through both the ally & steel so you can tap the flat steel after.
Separate the 2 and tap the steel flat & slightly over size the holes in the ally (I used 5mm dome socket heads, so as to not interfere with the sliding shovel mounts) Paint the flat steel.
5. fit it all up & see how it fits.....If O.K...Pop rivet the flat into position.

6. Now comes the tense bit, THE BIT EVERY ONE LOOKS AT!, this is where you will have to measure twice & cut once!!!!!
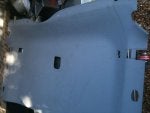
THE ROOF LINING! I spent an afternoon making sure this was right. The hole for the "C" channel has to be on the exposed side of the window surround & I cut a access window into the edge of the lining to get to the 5mm screws I had close to the lip for the sandwich effect to be fully effective. This involves lifting up/down the roof lining & half installing it quite a few times. From memory I extended the profile of the flat down the steel past where the roof lining ended to see where I was at! 1st hole to be cut was the hole to access the hidden screws right at the edge (there should be a mark where your window surround sit against the roof lining so don’t go too close to that. From this access hole, you can work out where the "C" racking will come through. start with a small hole & keep increasing it till your got a spot on hole. Really, It's not as bad as it seems, you've just got to take your time & get it right!