Patrol 4x4 - Nissan Patrol Forum banner

D.I.Y Bunnings Flares for GQ trols

38K views 51 replies 30 participants last post by  Zoltan  
#1 ·
gday all, today i put on my new bunnings flares to give more clearence around my 33" bighorns, and extended them a little, to put the tyre back under the flares, as they stuck out of the factory ones.


materials:
  • Lawn Edging from bunnings (100MM X 10M) - around $45
  • Aviation Snips or Tin Snips
  • box of metal self tapping TEK screws
  • Drill
  • Nicho
firstly, start by jacking up car, and removing wheel, obviously 1 at a time. and then, unscrew the or drill out the rivits (spelling) holdong the factory flares in place, then get your edging. and mark out a rough amount of how much you need, then screw it into place, i put screws around every 1.5 - 2 Inchs apart, so they arnt going far any time soon.


Image

Image


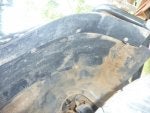
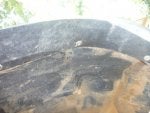
and then use a nicho to mark out you cut outs, and then remove, and cut, then screw back up to see how it looks, mine looked like this from the inside of the flare

Image


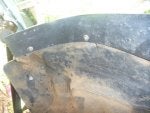
then, when you are satisfied, upull off your template, and cut 2 more outa the roll of edging, ans use your template to mark it out, and put all the same screw holes in it (remember to be carefull with the good ones, dont wana scratch them...lol)

Image


And rember to flip the template over to do the other sie of the car, otherwise, the flare will be either backwards, or the other side up.

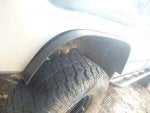
finaly after you have done the same for both front (and simply repeat the process for the rear flares aswell, screw them all in and the finished product should look like this

Image


Image


then, head out to your local flex ramp (woolies car park for me) and test them out, like this.

Image


Image


Image


in the last pic, i am aprox 5MM off bumpstop, not sure of how much droop is left on other side, with no lift, and my 33"Bighorns on. very very happy with that.


cheers for reading all
enjoy

jbates58
 
#2 ·
very nice

although i went one step further and fitted my factory flares back onto the bunnings flares then bogged and sanded , bogged and sanded bogged and sanded etc etc etc...

Image


Image


Image


Image


all the wheels are covered now and with the flares sitting lower , it doesnt look like it is lfted so much
 
#4 ·
i used that fiber glass bog so it is a bit stronger than normal bog , but yeah , if i hit them hard enough they would crack , but the plan is to fit some scrub bars to help protect the front and when i build the rear bar i will fit scrub bars to the rear wheels aswell

saying that , they are pretty solid and should handle most knocks without breaking
 
#5 ·
Image


in the last pic, i am aprox 5MM off bumpstop, not sure of how much droop is left on other side, with no lift, and my 33"Bighorns on. very very happy with that.


cheers for reading all
enjoy

jbates58
Thats in a carpark, if you take your car on a dirt road or off road section in wet the poor garden strip will be required to cut all the mud off the tyre at that clearance, let alone the actual body of the car.

It dumps way too low, and will probably dump lower when moving.:(
 
#6 ·
When drilling the screws into the body did either of you do anything to stop the screw holes from rusting when they get wet?
 
#13 ·
i actually used an orbital sander and varying grades of sand paper , i wouldnt have even attempted to do it by hand , its only about 20 to 30mm wider but it is enough so the boys in blue dont pick me for tyres sticking out past the flares , plus added a bit so they are a bit more nicley rounded and not sagging in the middle , i could have gone wider easy enough but there was no need for what i wanted to achieve , i basicly wanted to keep it looking factory so it doesnt stand out too much
 
#24 ·
I'm wasn't thinking of using rivets for rust prevention, could give two hoots about rust, this 4b will be dead in another two years anyway that way I treat it... I just thought it might be easier to pre-drill the holes in both the guard and the flare. But I'll just use self tapping screws now I recon.... Ones with a big flat head seem to be the go I recon.
 
#30 ·
Hers another option.
Bought garden edgeing from Mitre 10, $20 for ten metres.
Is about 5mm think.
Then used old factory flares to line up holes and used origanl screws from factory plastic flares. No need for extra drilling in guard. Was a bit hard to line holes up but just careful planning and double checking before drilling. Can use one side once finished to be jig for other, just drill on other side of Garden egdeing
Did this after breaking all the mounts from front flare.
Only complaint is they are very hard but have hit one on a bank and just pulled plastic from screw, no damage to body at all, plus flare just needs to be unscrewed and screwed back in.
 

Attachments

#31 ·
Sweet option! I can't find any of the 'Big' 4WD stores to sell replacement flares so I really like this option. Unfortunately I can't seem to find any of the mentioned items on-line - not Bunnings, not Clarke Rubber. Perhaps I have missed the boat ... Will keep trying...

Just a note - Midalia sell powder-coated pop rivets and they don't cost a lot and would prevent localised corrosion! 1000 = $40

Cheers :angel: