Patrol 4x4 - Nissan Patrol Forum banner
41 - 60 of 1,008 Posts
Thanks, after looking at your original pic I thought your setup was something like that, very impressive, I like it.

Mounting the pump to the bracket makes a lot more sense than trying to find a place to mount it and then protecting it.

Good work, I will borrow some of your ideas on that.
Copy away!

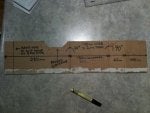
If interested I still have the cardboard template I can get some pics of that.
It's still got the dimensions and angles on it.

Only tricky bit was drilling into the fuel tank protection plate but a cheap right angle drill attachment sorted that and a piece of timber behind to protect the tank.

Cheers

Justin
 
Discussion starter · #42 ·
Copy away!

If interested I still have the cardboard template I can get some pics of that.
It's still got the dimensions and angles on it.

Only tricky bit was drilling into the fuel tank protection plate but a cheap right angle drill attachment sorted that and a piece of timber behind to protect the tank.

Cheers

Justin
Thanks, will definitely have a look at that. PM sent with email address if that's easier.
 
Discussion starter · #44 ·
No worries mate, it took me a long time to get my head around it as well, See comments above in red.


Thanks mate, look forward to the pics. Saw filters similar but smaller at Pirtek, they were around 30/40 micron which I think would be more than adequate for a prefilter. Really we are only trying to stop large rocks and small boys from getting through the LP.

Interestingly while I was at Pirtek buying bits the salesmen said to me, "do you own a Nissan Patrol"? Err yes, why? "because another guy was in here yesterday buying similar bits for his".
So somewhere up here on the sunny coast someone else is going through this mind bender.
Just as a bit of info for you, 40 microns is the smallest the eye can see, 1 micron can cause premature wear and is 67 times smaller than 40.

Just food for thought.
 
Discussion starter · #47 · (Edited)
Just as a bit of info for you, 40 microns is the smallest the eye can see, 1 micron can cause premature wear and is 67 times smaller than 40.

Just food for thought.
Yes, I understand Mate, I work with microns with packaging materials, that's how they are often measured in thickness. The average chip bag is somewhere around 40-50 micron thick.....

I have decided against installing a prefilter for the lift anyway, will take my chances and I think I'll be OK, they're pretty tough.

EDIT.

Here is a pic of template Parscheese emailed me.
 

Attachments

Yes, I understand Mate, I work with microns with packaging materials, that's how they are often measured in thickness. The average chip bag is somewhere around 40-50 micron thick.....

I have decided against installing a prefilter for the lift anyway, will take my chances and I think I'll be OK, they're pretty tough.

EDIT.

Here is a pic of template Parscheese emailed me.
Once bent up the bracket looks like this. The side shown below is the same side as the template. Obviously I have trimmed up the bracket to remove any excess steel. You can also see the final bend where bracket bolts to bash plate on fuel tank.

Image


Cheers

Justin
 
Discussion starter · #49 ·
Once bent up the bracket looks like this. The side shown below is the same side as the template. Obviously I have trimmed up the bracket to remove any excess steel. You can also see the final bend where bracket bolts to bash plate on fuel tank.

Cheers

Justin
Thanks, looks good Justin as I've come to expect from you, picked up a few more fittings and started on my wiring loom today (I'm an electrical dyslexic as I often say so this can be tricky for me). Whitie has given me a some clues so I am going to put in a 3 way switch (under bonnet) for bleeding and isolation purposes and switch it through a relay off the wiper motor (same as I did for CC IC fan).

Also putting in a bleed point and gauge (under bonnet as well) will update schematic later.

Seeing as I'm not using a prefilter I can shorten up the mount bracket a bit I think, not a lot I can do through the day under the vehicle, my Garage faces West and it's bloody hot.

Id suggest make the braket as described earlier, that way if you do decide later on down the track to put in a pre filter for the carter, you wont need to make another protection box.

and just had a read through, and its some very good work :) still doesnt make me want a 3L tho :p
 
Discussion starter · #51 ·
Id suggest make the braket as described earlier, that way if you do decide later on down the track to put in a pre filter for the carter, you wont need to make another protection box.

and just had a read through, and its some very good work :) still doesnt make me want a 3L tho :p
Understand where your coming from and today I picked up some 90dgree fittings that meet with my flow expectations so very happy, this does give me more room to work with. I can still do a slightly compressed bracket using a T frame module as protection rather than a door (it's in my mind not on paper yet) that will allow me room for a smaller replaceable/throw away filter if needed later).

Had a good look at the original filter 90's today and bloody hell, what have I been worrying about, they are the worst bloody flow restictions you could come across 5/16" at best......

Also my Y fittings arrived today so the layout is on my Kitchen table (much to the wife's disdain).

Installing 3way switch and relay right now, pics will follow.
 
When I was in the States I looked at many pumps, Fass, etc etc, and different types including Gerotor, rotary vane and solenoid. It was very close between the Walbro FRD11 and the Carter 4600HP, the up market US pumps were excellent but very large and very expensive, some requiring separate regulators and separate return lines, too complicated.
The flow through the Walbro is 55gph and around 5psi whereas the Carter is 100gph and 7 psi (this is free flow and not what you will get when fitted up), both pumps have no issue pumping diesel, some others the makers shy'd away when you told them diesel was going through them. For all intents and purposes you require 2 x Walbo's to achieve a similar result.
It has taken me a long time to get my head around the spill line mod, but I remember several threads over the years about guy's unknowingly filling there engine with diesel from a spill line leak where it runs under the rocker cover, any increase in the return may just cause a problem and the benefit is a cooler fuel run.

..........................

Cheers

...........................

Thanks Geeyoutoo,

So how do you mod the spill return line to remove it from under the rocker cover? It sounds like this would be a good mod in its self regardless of whether a lift pump is fitted if it reduces fuel temp so improving IP cooling.

Grogey
 
Discussion starter · #53 ·
Thanks Geeyoutoo,

So how do you mod the spill return line to remove it from under the rocker cover? It sounds like this would be a good mod in its self regardless of whether a lift pump is fitted if it reduces fuel temp so improving IP cooling.

Grogey
I think your right. There are a few pics around but none that show the mod very clearly, it is my intention to move the lines around a bit so as to get a very clear Pic to post up as part of the installation.
Have been working on the electrics and got that sorted on paper, just started the wiring yesterday (mounted the 3 way switch and relay), am hoping for a eureka moment on the bracket today so as I can start to fabricate that. Going to borrow heavily from the Parscheese design, just a little more compact.

Worked out my fuel bleed point as well. Hopefully be able to put up some pics of the work so far in the next few days.

After that it's the FCD 2 fuel cut defender install.............
Forgot to mention i had the basic plate folded up at my local steel supplier.

I then did all the final cutting and the last fold to bolt to tank bash plate.

Cheers

Justin
 
Discussion starter · #55 ·
Forgot to mention i had the basic plate folded up at my local steel supplier.

I then did all the final cutting and the last fold to bolt to tank bash plate.

Cheers

Justin
Just picked up my pieces of 2mm plate from Maroochy Sheet Metal so will be underway soon, pissing down here today, 80mm rain in one hour yesterday and not doing much better today...... so will be doing more on the electrics methinks.
 
Discussion starter · #56 · (Edited)
Wiring now complete, used tinned wire and did the main run in 6mm twin core, not going to earth the pump at the back, have brought it back to under the bonnet and use one of the main common earth points on the inner guard. Lots of dust in the eyes (not good for contacts) while running the cable on top of the chassis, but all has really good protection.

Set up an isolator/activate switch on a bracket attached to the filter mount body.

Just below and in between the wiper motor and bonnet hinge are two plastic plugs in the firewall, there is a gap behind them, using a piece of plastic tube over a drill bit to control depth I drilled one hole out to accept a 5mm Rivnut and have mounted the controlling relay to that (was running out of bloody room).

Picked up the acc switching wire for the relay from the wiper motor (same as I did for the CC IC fan).

Had my epiphany/eureka moment with the pump mount bracket this morning, bent up the shape in a coat hanger and the guy I bought the plate off is bending to suit, should have that back Monday afternoon and will put up pics of that. Mine is a little more compact than Parscheese's nice unit but will still be able to fit a filter in if I ever need to, but my plan is to avoid this.

In the 5th pic you can clearly see (from right to left) the return line/main fuel line/spill line in their original form. Will get a good pic of the actual mod when I do it.

Image


Image


Image


Image


From right to Left. Return line/main fuel line/spill line in their original form.
Image
 
Discussion starter · #57 · (Edited)
Carter 4600HP Lift pump is in and working, on the outlet side of the std OM filter I have 5psi which drops to 3.5-4psi when the pump internally regulates and I have a nominal 1psi at 3000rpm. Updating installation bits and pieces bellow. I used a lot of stainless steel Rivnuts/Nutserts in mounting the pump frame to the chassis and tow bar, a lot easier than mucking around with bolts and nuts, for me anyway.

Parts list for lift pump connection:
2 x 3/8" barbed Y sections.
4 x 3/8" BSP x 3/8" straight male barbed fittings.
1 x 3/8" BSP male/female elbows.
1 x 3/8" BSP non return valve with viton seals.
1 x metre of 3/8" fuel hose.
12 x hose clips suit 3/8" fuel line.

Parts for primer switch and bleed point:
1 x 1/4" BSP female T.
1 x 1/4" BSP x 3/8" straight barbed fitting.
1 x 1/4" to 1/8" BSP reducing bush.
1 x 1/8" BSP taper plug. (note.. was going to fit a small 1/8" BSP ball valve for bleeding but changed my mind mainly on safety reasons, decided to have a point I could just crack to bleed)
1 x 3 way On Off On switch.
1 x Narva 68044 relay with 87and 87a connections.

I did not cut or remove any of the existing hoses or pipes, this can all be reversed quite simply. The connection from the Lift pump to the steel fuel line, just at the top of the tank, is quite awkward due too limited room (particularly breaking the grip of the original hose) but with care and composure it can be done.

Spill line mod and filter bleed/pressure test point also included. Parts required for spill line mod are:
2 x 1/8 bsp x 1/4 barbed fittings, male.
2 x 1/8 bsp x 3/16 barbed fittings. male.
1 x 1/8 bsp T. Female. (into which go the 90 degree, 2 x 1/4 barbs, 1 x 3/16 barb).
1 x 1/8 bsp 90 degree, male to female.
1 x 1/8 bsp cap. (The cap goes on the final 3/16 barb which blocks the spill return to the pump)
5 x small hose clips.

I'd like to thank Parscheese as I did borrow from his frame design and Whitie for helping me with a sketch of relay circuitry (as said I'm an electrical dyslexic).

Next Mod, the FCD 2, start pulling the wires today.

1. Pump mount sketch and revised flow schematic.
Image


2. Basic pump frame, pump lower protection plate and chassis support bracket after painting with original Carter mount plate bolted on.
Image


3. Frame mounted in vehicle.
Image


Image


4. Pump plumbed and wired, Also pic of bypass line and Y intersection.
Image


5. Bypass line with non return valve between Y sections.
Image


5. Spill line mod.
Image


6. Pressure testing access at filter exit and isolation switch mounted on the filter housing. Pump relay mounted on firewall using a small rivnut in an existing hole in the firewall drilled out marginally (a small section of plastic hose was slid over the drill bit to prevent deep penetration.
Image
 
Discussion starter · #59 ·
Do you notice a difference when driving geeyoutoo?
or was it to help out the IP
Only just finished it this morning so no real test yet, but, the main reson was IP support, my old girl is 12 years old now so every little bit helps, plus now I'm retired I need something to keep me off the streets :rolleyes:.

I will update the thread as soon as I get a valid feel for it. Hoping to get it dyno'd in the not too distant future but want to get the FCD 2 in as well, then we can run it up with them on/off and any combination thereof.
 
41 - 60 of 1,008 Posts